Integrating with Trim
The Weave/Trim integration provides a two-way link between Weave and Trim. That is Trim can call out to Weave to display information about a document and Weave can call out to Trim to display documentation associated with an entity.
For additional information about using the newer Weave Hub integration please see this page Weave Hub - Third-party Application Integration.
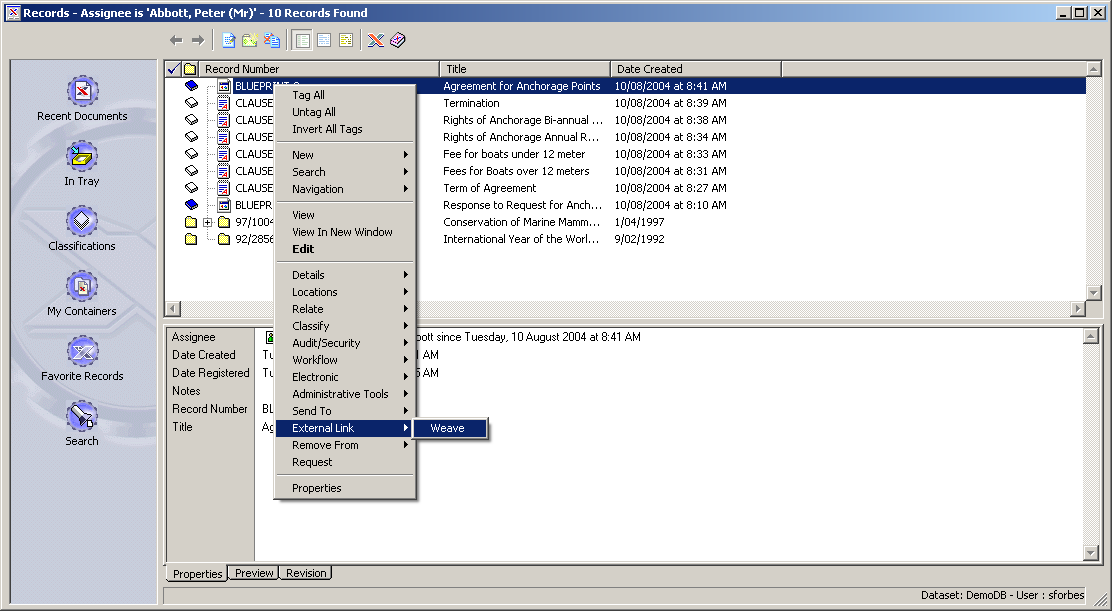
Opening Weave from Trim
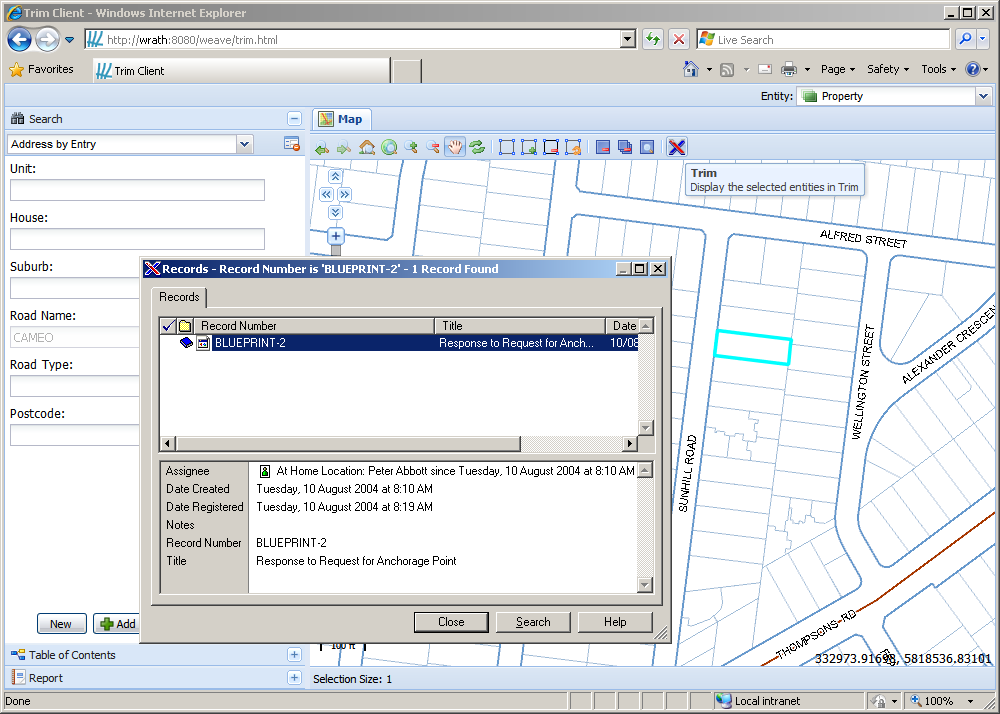
Opening Trim from Weave
Client Workstation
The link between Weave and Trim requires the installation of components on each client computer that will be communicating between Weave and Trim.
The following sections outline the installation and configuration of these components.
HP CM 9.x
Installation of the client components is now supported via an msi installation package which can be downloaded as part of the Weave Interop installer, available at http://downloads.cohga.com/weave/.
The Interop installer will copy the Weave/Trim client component packages to the interop\trim\ directory at the installation location specified when running the installer. Note that the Interop installer is intended to be use to install additional component required for a Weave server to interact with Trim, beyond just the client components, and should generally be pointed to a Weave installation directory when it's run, but if you just require the latest versions of the client installation packages you can point the installer to a temporary where you can then copy the required installation packages from and then just delete the temporary directory.
There are two installation packages available, TrimSetup.msi, for 64-bit Windows, and TrimSetup32.msi, for 32-bit windows, which should be copied to each client and installed. The installation requires no additional input from the user so can be automated using standard msi processes.
HP RM 8.x
Downloads
WeaveTrimLinkNet8.dll - Component to link from Weave to HP RM 8.x
TrimWeaveLink.exe - Executable to link from Trim to Weave
Installation
Two Trim specific files, WeaveTrimLinkNet8.dll and TrimWeaveLink.exe, must be copied to each client PC, along with the weave link components (see WeaveLink for more information) and additionally WeaveTrimLinkNet8.dll must be registered.
This should be performed using the RegAsm.exe application provided with Windows, e.g.
c:\Windows\Microsoft.NET\Framework\v2.0.50727\RegAsm.exe WeaveTrimLinkNet8.dll /codebase /nologo
c:\Windows\Microsoft.NET\Framework64\v2.0.50727\RegAsm.exe WeaveTrimLinkNet8.dll /codebase /nologo
Un-installation
The installation can be undone by using RegAsm.exe
c:\Windows\Microsoft.NET\Framework\v2.0.50727\RegAsm.exe WeaveTrimLinkNet8.dll /unregister /nologo
c:\Windows\Microsoft.NET\Framework64\v2.0.50727\RegAsm.exe WeaveTrimLinkNet8.dll /unregister /nologo
TRIM
Downloads
WeaveTrimLink.dll - Component to link from Weave to Trim
TrimWeaveLink.exe - Executable to link from Trim to Weave
Installation
Two Trim specific files, WeaveTrimLink.dll and TrimWeaveLink.exe, must be copied to each client PC, along with the weave link components (see WeaveLink for more information) and additionally WeaveTrimLink.dll must be registered.
This should be performed using the regsvr32.exe application provided with Windows, e.g.
regsvr32 "C:\Program Files\Weave\WeaveTrimLink.dll"
Un-installation
The installation can be undone by using regsvr32 with the "/u" parameter, e.g.
regsvr32 /u "C:\Program Files\Weave\WeaveTrimLink.dll"
Server
Installation
The bundles for the server should be installed using the Interop installer for the version of Weave that you are running, which is available from http://downloads.cohga.com/weave/.
Configuration
Server
For Weave to communicate with Trim there needs to be a number of parameters specified which link the Weave entities to the database in Trim.
Firstly the trim namespace must be added to the config.xml file header (or a separate trim.xml file can be created and included into config.xml)
<?xml version="1.0" encoding="UTF-8"?>

<config xmlns="urn:com.cohga.server.config#1.0" xmlns:trim="urn:com.cohga.trim#1.0">
...
</config>
then the trim configuration must be setup to provide the connection information required for Trim and to tell Weave what entities to allow the transfer for.
There can be more than one configuration for trim, for example, one for a production instance and one for a test instance, each identified by their id in the trim:config item (which is production in the following example). Which configuration is used by the client is determined when the Trim action is added to the client configuration (via the "version" attribute of the client configuration action).
<?xml version="1.0" encoding="UTF-8"?>

<config xmlns="urn:com.cohga.server.config#1.0" xmlns:trim="urn:com.cohga.trim#1.0">

  <trim:config id="production">
	<entity id="property" field="field" dbid="41"/>
	<entity id="roads" field="field" dbid="41"/>
  </trim:config>

</config>
Name | Description |
|---|---|
id | The entity that should be enabled |
field | The field in the Trim database that contains the id of the selected entity, # for the record number field |
dbid | The id of the database on Trim to use |
filter | An optional filter that will transform the Weave id's into a value suitable for Trim |
Client
Once the server have been configured the Trim action can be added to a toolbar in the client configuration.
<item action="com.cohga.trim.Send" version="production"/>
You need to include the version attribute to let the Weave to Trim link know which Trim config to use, production in this example. The version attribute should match the id of a trim:config tag.
Filtering identifiers
If you need to filter the values before sending them to Trim, because Trim uses different identifiers for the entity than Weave does, then you can specify a filter when seting up the entities in the config details and add the definition for the filter. Note the addition of the new xmlns:filter="urn:com.cohga.selection.filter#1.0" namespace.
<?xml version="1.0" encoding="UTF-8"?>

<config xmlns="urn:com.cohga.server.config#1.0" xmlns:trim="urn:com.cohga.trim#1.0" xmlns:filter="urn:com.cohga.selection.filter#1.0">

  <trim:config id="production">
	<entity id="property" field="field" dbid="41" filter="trim.property"/>
	<entity id="roads" field="field" dbid="41"/>
  </trim:config>

  <filter:db id="trim.property">
    <datasource>main</datasource>
    <table>GEMS_LINK</table>
    <keycolumn>PID</keycolumn> <!-- column used in spatial database -->
    <idcolumn>PRUPI</idcolumn> <!-- column required for trim -->
  </filter:db>

</config>
Trim Configuration
To setup the link from Trim to Weave the Trim application must be configured with an external link to the TrimWeaveLink.exe program. This program will use the WeaveLink API to interact with the Weave client performing any operations necessary to perform the link from Trim to Weave.
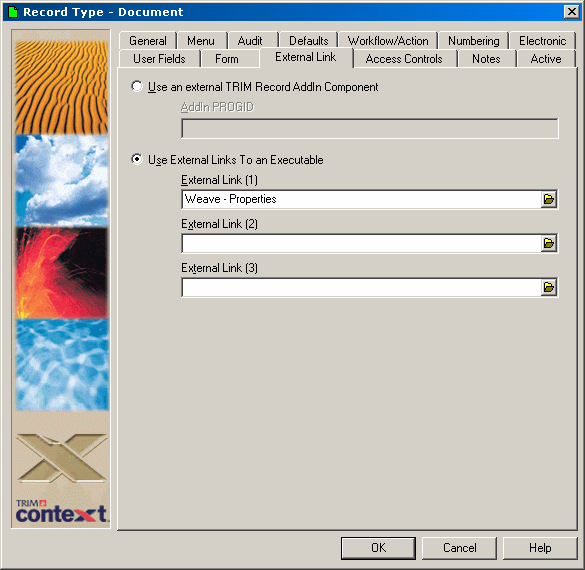
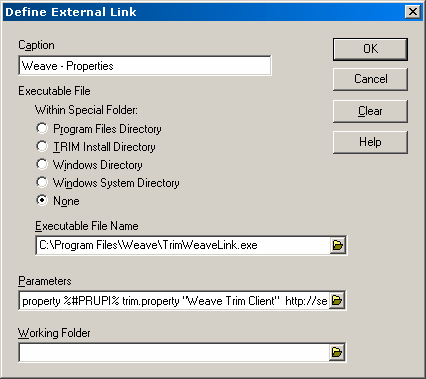
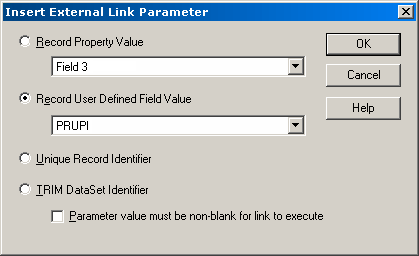
This first screen shot shows the external link being set for the record type on trim. The next screen show shows the actual setting required.
The settings required for the link from Trim to Weave are the name of the executable, TrimWeaveLink.exe, plus the parameters to pass to the executable.
Note the executable must have previously been copied to each PC, and the path where the executable was copies to should be used here.
There are four parameters that are specified for the executable:
- The entity id, in this case 'property', this is the id of the corresponding entity in Weave.
- The value for the id to send, this is set as a marker using %#...% format, in this case it'll use the PRUPI field attached to the document, this will be different depending upon what value you need to use from the underling trim document to uniquely identify the corresponding entity in Weave.
- A filter to use to transform the identifiers sent from Trim to Weave before updating the selection in Weave, if no translation is required then 2 quotes (denoting an empty filter) "" should be used for this parameter, if this value is set then Weave will use a filter that's been previously configured with this id to transform the identifiers to a value suitable for Weave.
- The window title of the Weave client browser window, this is so that the link can find an existing Weave client before trying to start a new one. This should match the start of the window title of the browser which will generally match the title set in the Weave client configuration.
- The startup URL, this is the url required to start a new Weave client session if one matching the window title can't be found.
Finally the field to extract from the document to send to Weave must be specified.
