How to Add a New Active Layer
- Lucy Minato (Deactivated)
- Graeme Taylor
When you have a layer that you want to graphically select from, and report on its attributes, it needs to be set up as an Active Layer. This article assumes that you already have some Active Layers configured in Weave.
Step-by-step guide
- If the layer you want to add as a new Active Layer is in the Table of Contents (TOC), make a note of the name shown in the Weave TOC (on the Layers panel).
- Generally, an Active Layer is related to a Map Layer from the TOC but this does not need to be the case. In the extreme, you can have just one raster base map in your TOC but you will still be able to do a graphical selection and have the selection appear over the raster map. In this case it will appear as though features on the raster map have been selected, but in fact it is the vector layer, that covers the same geographic area as the raster map, that is used in the graphical selection (through the Spatial Engine).
- Generally, an Active Layer is related to a Map Layer from the TOC but this does not need to be the case. In the extreme, you can have just one raster base map in your TOC but you will still be able to do a graphical selection and have the selection appear over the raster map. In this case it will appear as though features on the raster map have been selected, but in fact it is the vector layer, that covers the same geographic area as the raster map, that is used in the graphical selection (through the Spatial Engine).
- Open your
toc.xmlfile for editing. Search for the name of the Map Layer you identified above (it will appear as thelabelXML Attribute). Note the value of thelayerXML Attribute.
While you have the
toc.xmlopen, add an XML Attribute calledentityto the end of that entry line.
In the example below the XML Attributeentityis added to thecounciltreeslayer and is set tocounciltrees:<entry id='l_mapengine.main_counciltrees' layer='counciltrees' label='Council Trees' checked='false' entity='counciltrees'/>
Adding this
entityattribute sets the relationship between the Active Layer and the Map Layer that is drawn from the TOC and means the Map Layer in the TOC will be highlighted when the corresponding layer is selected from the Active Layer drop-down list. To have the Set Active option available on the TOC Context Menu (right mouse click), ensure you have theweave.toc.selectLayeritem enabled in theclient_main.xmlfile. This will most likely have been done by Cohga during your Weave installation.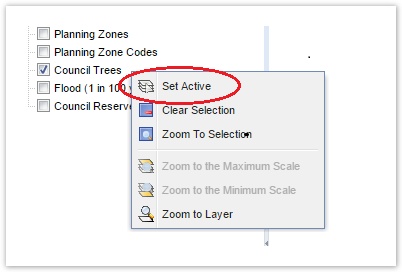
Open your
entity.xmlfile for editing. Add an XML Element for this entity. The value of the (XML Attribute)idfor the entity (shown in the example code below) should match the (XML Attribute)entityfrom thetoc.xmlfile (shown in Step 3). In our example the value of theidis "counciltrees".
<entity:entity id='counciltrees'>
     <label>Council Trees</label>
</entity:entity>
Thelabelin theentity.xmldoesn’t have to match thelabelin thetoc.xmlfile but unless there’s a good reason why these should be different, it’s recommended to keep them the same to avoid confusion for the user.- If you refresh your browser you'll now see the Active Layer has been added to the Active Layer drop-down list (i.e.
Council Trees). However it will have a different icon to the other Active Layers in the list as it hasn't been linked to a spatial database.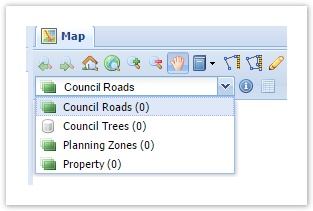
Stay in the
entity.xmlfile. You now need to specify where the spatial data for the selection will be coming from by adding anothermappingXML Entity that links the Active Layer to its relevant Spatial Engine. Add this to themapperXML Element that is reading from the required Spatial Engine,and include the table name, key field, etc. as shown below.<mapping> <entity>counciltrees</entity> <spatialengine>postgis</spatialengine> <table>counciltrees</table> <key>ogc_fid</key> <dynamic>true</dynamic> </mapping>
You can also set afilterXML Tag so that only features that meet certain criteria will be considered for selection (see Spatial Mapper).
If there are no Active Layers from the Spatial Engine you need to access already defined in theentity.xmlfile, then you'll need to add a new tag for that Spatial Engine. For simplicity, give this mapper an id ofmapper.<spatialengine_id>as shown below.<mapper:mapper id='mapper.postgis'> <mapping> <entity>counciltrees</entity> <spatialengine>postgis</spatialengine> <table>counciltrees</table> <key>ogc_fid</key> <dynamic>true</dynamic> </mapping> </mapper:mapper>
If you refresh your browser you'll now see that the icon for that Active Layer (i.e.Council Trees) has changed to a layer-like icon.This icon indicates that the Active Layer is now a spatial layer.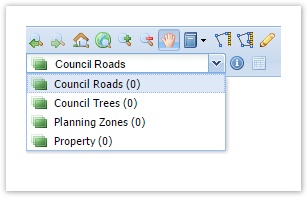
If you now run a spatial selection, the selected features will be highlighted in the Map Window. The number of features selected will be reported as the "Selection Size" in the Status Bar at the bottom right corner of the Weave window.
Also refer to the following sections of the Weave System Administrator Guides:
Related articles