How to Create an Image Slider
- Lucy Minato (Deactivated)
There are many things to consider when adding an Image Slider in order to get the result you desire. Also affecting the workings of your slider is what is serving the images and whether they have the ability to set image transparency. These considerations are covered in other sections of the Weave Configuration Reference.
The instructions below cover how to add a simple image slider when you have a number of vector layers in your Table of Contents and are looking to provide the user the ability to turn on one of three images via an Image Slider. This is by no means the limit of what can be done, it's merely an example of what can be done.
Step-by-step guide
Add the
imageTransSlidercomponent to your client XML file. This is added to the Map View and will use existing Map Engines.<view id="com.cohga.html.client.map.mapView"> <label>Map</label> <location>center</location> ... <statusbar> <item>Image Slider</item> <item></item> <item component="weave.compassImageTransSlider"> <width>120</width> <value>0</value> <increment>10</increment> <disabled>false</disabled> <mapEngine>mapengine.google.satellite</mapEngine> </item> <item>Google Satellite</item> </statusbar> ... <mapEngine id="mapengine.google.satellite" /> <mapEngine id="mapengine.main"> <options> ... </options> </mapEngine> ... </view>
- Primary image slider will transition between the layers in your ToC and the Map Engine given in the
imageTransSlider. More information about the Image Slider can be found here. To add a secondary imagery slider more configuration is required.
		<view id="com.cohga.html.client.map.mapView">
			<label>Map</label>
			<location>center</location>
			...
			<statusbar>
				<item>Image Slider</item>
				<item></item>
				<item component="weave.compassImageTransSlider">
					<width>120</width>
					<value>0</value>
					<increment>10</increment>
					<disabled>false</disabled>
					<mapEngine>mapengine.google.satellite</mapEngine>
				</item>
				<item>Google Satellite</item>
				<item></item>
				<item component="weave.compassSecImageTransSlider">
					<width>120</width>
					<value>0</value>
					<increment>10</increment>
					<mapEngine>mapengine.google.alt</mapEngine>
				</item>
				<item component="weave.compassSecImageChooser">
					<layer id="0" text="Google Maps Alt" mapengine="mapengine.google.alt" isDefault="true"/>
					<layer id="0" text="Google Maps Alt Terrain" mapengine="mapengine.google.alt.terrain" />
					<layer id="0" text="OSM" mapengine="mapengine.osm" />
				</item>
			</statusbar>
			...
			<mapEngine id="mapengine.google.satellite" />
			<mapEngine id="mapengine.google.alt" />
			<mapEngine id="mapengine.google.alt.terrain" />
			<mapEngine id="mapengine.osm" />
			<mapEngine id="mapengine.main">
				<options>
					...
				</options>
			</mapEngine>
			...
		</view>
This will result in two sliders as shown below.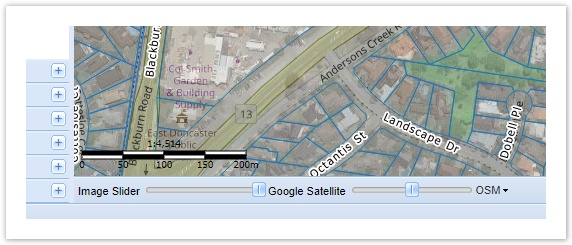
Also refer to the following sections of the Weave System Administrator Guides:
Related articles